>Conserving Resources: It’s as simple as a barrel.

>Green Moms Carnival is hosted by Mindful Momma this month, and they’re posting on the topic of Conserving Resources. I didn’t post far enough ahead to actively participate, but I can still contribute.

One of my favorite ways to conserve a finite resource is by using a rain barrel. In fact, I liked the rain barrel so much I bought a second one in August! Here’s a quick 3-2-1 summary of the highlights of my special water-conserving tool.

Three reasons to use a rain barrel instead of a conventional sprinkler:

1. Set it up correctly, and it’ll water the roots, not the leaves, of the plants.
2. The water goes directly into the soil; very little evaporated.
3. It’s rain water. It doesn’t have to go through the treatment plant before it waters my garden.

Two changes in thinking with the rain barrel:

1. I’m careful with the water. After all, I “harvested” this myself!
2. I use this water to rinse litter boxes and compost buckets, too.

One final thought in favor of rain barrels:

1. It saves the potable (drinkable) water for its intended purpose: human consumption.

Share and Enjoy !

Shares

>Bake with local fruits: Apple – cranberry crisp

>I live in the middle of a small city, but I still enjoy reading Living the Country Life. I might skip the article on choosing a healthy breeding pair of peafowl (peacock and peahen, for other city folk), but I’m sure to enjoy the photos and the recipes. I found this one in the October issue.

Crimson Cranberry-Apple Crisp

3 Tablespoons granulated sugar
1 teaspoon ground cinnamon
3 cups sliced, peeled cooking apples
2 cups cranberries (fresh or frozen)
1/2 cup quick oats
1/4 cup packed brown sugar
2 Tablespoons wheat flour
1 Tablespoon wheat germ (optional)
1/4 teaspoon ground nutmeg
3 Tablespoons butter or margarine
2 Tablespoons chopped nuts (optional)

Step 1: In a small mixing bowl, cmobine granulated sugar and cinnamon. Place the apples and cranberries in an ungreased 1 1/2 quart casserole. Sprinkle sugar-cinnamon mixture over fruit. Toss gently to coat. Bake, covered, in a 375 degree (F) oven for 25 minutes.
Step 2: Meanwhile, make the topping. In a small mixing bowl combine oats, brown sugar, flour, and nutmeg. With a fork or pastry blender, cut in butter or margarine until mixture resembles coarse crumbs. Stir in nuts or wheat germ, if you like. Remove cranberry/apple mixture from oven. Sprinkle topping over partially cooked fruit mixture.
Step 3: Return to oven and bake, uncovered, for 15-20 minutes more or until fruit is tender and topping is golden. Cool slightly. Serve warm with whipped cream or ice cream or other delicious topping. Makes 6 servings.

Living the Country Life suggests using 1 cup dried cranberries if fresh or frozen are not available. Right now, I suggest browsing the farmers’ markets for fresh apples and keeping an eye out for cranberries. I used Macintosh apples; I’d stick with sweet apples to counter the tart taste of the cranberries.

Share and Enjoy !

Shares

>Seven Ways I’m not "Green Enough" – and why it’s okay

>I have a talent recognized by me coworkers; I can rationalize almost anything. This skill comes in handy when applying for grant money or writing persuasive papers. In the real world, rationalizing helps balance wishes with reality. I wish I could be more eco-conscious, but when all is said and done, I’m pretty darn good. Here are my confessions, along with the rationale for each weakness.

1. I don’t own a clothesline.

Family members have seasonal allergies, so hanging clothes in the pollen-filled breeze is a bad idea. Sleeping in sheets dried outside will trigger sneezing and wheezing at the least, hives at worst.

2. I use commercial laundry detergent and dishwasher soap, too.
Time is money and money is time, so making and experimenting with DIY soaps isn’t practical. I do use anti-static dryer balls instead of fabric softener in all loads but delicate. The Balls don’t work as well with sweaters.

3. I drive a minivan.

We still need to move La Petite back and forth to college a few more times, and the minivan is also the only vehicle (short of a full sized van) that will hold Amigo’s recumbent 3-wheeler. This is a need, not a want. My elderly minivan (a 1998 Pontiac Transport-Montana) would have qualified in the recent Cash for Clunkers rebate. I didn’t do it. The new, and smaller and more fuel efficient vehicles are great in concept, but I don’t think the program would have rewarded me for trading one minivan in for another, not to mention the challenge of making car payments and tuition at the same time.

4. Chuck (the husband with the cool shoes) buys bottled water, and I don’t stop him.

This is a convenience issue. He needs to be able to grab a bottle and go, taking it with him on the job. Amigo and I solve this by filling our reusable bottles at the school’s water fountains (bubblers, in the local vernacular). Chuck doesn’t. Oh, well, it’s a balance.

5. I use paper coffee filters.

I compost them. ‘Nuff said.

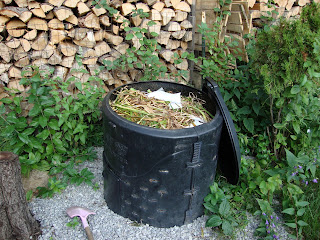
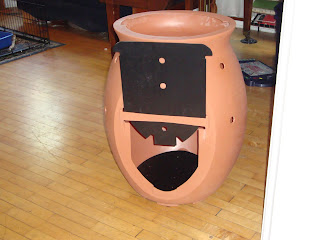
6. I don’t compost year-round.

This is a weather/ climate problem. I’ve noticed that scraps placed in the bin in October or November will still be whole and recognizable in late March or April when it’s time to spread the compost and till the garden plot. It’s simply too cold here in the Northern Realms for the process to happen naturally. The bin itself is in the back of the yard, difficult to get to in the snowy Wisconsin winters. I’m working on this dilemma; I’ve placed the new composter where I can reach it in midwinter, and I plan to let the big bin sit for an additional year. Eventually, I’ll be letting one sit and decompose while I fill the other, and then switch.


7. We don’t use cloth bags at the grocery store – well, not all the time.

Amigo and Chuck do the grocery shopping and do it well. They prefer not to be bogged down in details like bringing bags to the store. When it’s just me, I re-use the paper bags they bring home. If we’re just stopping in for a few things, we use the cloth bags I keep in a convenient place at home or in the car’s glove box. It’s a start, and we’re getting better. We hardly ever get “new” plastic bags in the house any more. Again (see #4) it’s about balance.

So on we go, along the long and winding road of getting greener each day. It’s discouraging sometimes, when spreading the word feels like trying to teach kids to work on their math without talking (if you know the secret, I’m listening). But as my eco-colleague says over at the Green Phone Booth, feeling overwhelmed doesn’t have to mean becoming immobile.

Share and Enjoy !

Shares

>Decisions: where to put the new compost bin

>My new compost bin is decorative enough that I could put it anywhere — even in my front yard!

It could go in the back, nestled in the small rosebushes.

Then there’s the deck, near the herbs and the geraniums. Or should it go near the polka dot chairs?

Ah, here we go. It’s not as picturesque as the front yard or the roses, but it’s practical. Next to the garage, in a place where I can reach it even when there’s snow on the ground. It’ll be easy to get the kitchen scraps in it all year long.

(Guest appearance by La Petite)
The new composter is from Algreen Products. It’s available at GardenSuperMart.com. College student posing inside not included.

Share and Enjoy !

Shares

>New Composter!!

>I’m a garden geek. My son calls me a green freak. My daughter? You’ll see.

Husband tolerates and even supports my green proclivities. In fact, he brought home my first composter and later bought me a pitchfork to go with it. Lately I’ve been hinting that I need a second compost bin. “What’s wrong with this one?” he asked. “Nothing’s wrong with it; it’s full.”

That was in May. Luckily, compost compacts as it decomposes, making room for more. Now it’s August, and the bin is filled to the brim with organic matter. It needs stirring, and then I’d really like to leave it alone for a full year – a full twelve months or more. That means next spring I would not empty the bin and till it into the garden soil; I’d let it sit until spring 2011 instead, giving everything a better chance to decompose completely. But meanwhile, where would my kitchen scraps and yard waste go? Enter the new composter.


My new composter is smaller and cuter than my big beautiful bin. It has some nice features, too. This composter has a base and an insert to keep the solids off the bottom and let the liquids, the “compost tea,” drain off, and a spigot in front for collection. Compost tea makes a great fertilizer, I’ve been told.

When I want to empty the compost, I simply open the back. It stays open nicely, which will make it simple to shovel the rich soil enhancer into my wheelbarrow.


The holes in the sides have purpose: they allow air to circulate and speed up the process, and the holes are big enough that I can poke a broom handle or stick inside to aerate the compost itself. And last, I mentioned it’s somewhat smaller than my old one. It’s still a hefty size – big enough to fit a college senior inside. Yes, that’s La Petite, modeling the new composter for all of my lovely readers.

The new composter is from Algreen Products. It’s available at GardenSuperMart.com. As soon as I decide where to place it, I’ll post more pictures! Then I’ll fill it with kitchen scraps and weeds and other organic goodies, and let the compost happen.

Share and Enjoy !

Shares

>Raspberry Muffins

>Did you freeze raspberries and blueberries when they were in season? I did. I made these recently, and I hope I’ll make them again when snow is on the ground and I can pull a bucket of fresh-frozen berries out of the freezer. If your farmers’ market still has fresh raspberries, pick up a pint and make these.

Raspberry Muffins
from the Good Home Cookbook, my go-to book for standards and fun cooking facts

Ingredients
2 cups all-purpose flour
1 cup sugar
1 teaspoon baking powder
1 teaspoon baking soda
1/2 teaspoon salt
2 large eggs, lightly beaten
1 cup buttermilk
1/4 cup (1/2 stick) butter, melted
2 cups (1 pint) fresh or frozen raspberries

Directions:
1. Preheat the oven to 400 degrees F. Grease and flour a 12-cup muffin pan or line the pan with paper baking cups.
2. Stir together the flour, sugar, baking powder, baking soda, and salt in a medium bowl. Set aside.
3. Beat together the eggs, buttermilk, and butter in a small bowl. Stir into the flour mixture and mix just until moistened. Fold in the berries.
4. Divide the batter evenly among the muffin cups.
5. Bake for 18-20 minutes until golden brown.
6. Cool for 10 minutes. Remove from the pan and cool briefly on wire racks. Serve warm or cooled.

In my kitchen? I serve warm with a side of fresh coffee.

Tips:
drain raspberries as much as possible or the muffins will have a reddish color. Not that there’s anything wrong with that….
I like to substitute half wheat flour for the white, using a total of 1 cup each.

Share and Enjoy !

Shares

>Applying the lessons of Animal, Vegetable, Miracle

>I read Barbara Kingsolver’s Animal, Vegetable, Miracle recently. It is an amazing book, fitting my sensibilities and interests well. Kingsolver and her family dedicated a full year to feeding their family on local foods. The backstories describing her reasoning and the supplemental stories describing her disasters and successes make this a great story. Animal, Vegetable, Miracle is an easy and fascinating read.

Implementing her advice is more challenging. Kingsolver addresses this, facing the fact that not everyone has a large garden space like hers or the opportunity to raise chickens, turkeys, or other meat animals. She spends a significant amount of space on suggestions for folks like me, people who would like to move toward a more locavore philosophy but face stumbling blocks on the way.

My garden is coming into its season now. I’ve been gathering spinach and lettuce already, and I found the first handful of beans when we came home from vacation. Pea pods look good, too. This is the first year I’ve successfully grown peas, so I’ll have to look them over carefully to make sure I only pick those that are truly ripe! There are at least three zucchini appearing from the blossoms, and I see flowers on the tomato plants at last.

Here in the Northern zones, we don’t get as much food for as long as Kingsolver does on her small Virginia farm. I can use what I have, though, and pick up more local goodies at the farmers’ market every Saturday until October. For now, at least, I’ll put delicious and local foods on the table. Next year’s goal: learn to can. Maybe. We’ll see.

Share and Enjoy !

Shares

>Eat in, Cook local

>My Daily Action Plan email from Going Green Today suggested, “Eat in, cook seasonal.” The focus was on preparing a dinner that highlights the flavors of local and seasonal ingredients. Requirements: local produce, a creative mind and some good seasonings.

I have ideas already: Strawberry Rhubarb bars, chicken-tomato-spinach stew, egg salad sandwiches, to name a few.

Local ingredients in Egg Salad Sandwiches:
Fresh eggs (organic, free range)
Garden lettuce
Homemade bread or local bakery buns/bread

Local ingredients in stew:
Tomatoes from Farmers’ Market (I’ll have my own later in the summer!)
Spinach from garden
Herbs from garden

Local ingredients in bars:
Strawberries from Farmers’ Market
Rhubarb from garden

Did you notice that I didn’t obsess with making every part of each dish local or organic? It would be great, but it’s not realistic in my crazy-busy life. These ideas meet the goal of eating local, put a little more nutrition into the family diet, they’re simple to make, and each one tastes good, too. The bonus was this: I made the egg salad and the bars during our rummage sale. Having something good to eat and easy to make kept us from wasting our time and money on fast food on those busy days.

If you’re interested in a personalized action plan, look to Going Green Today.

Share and Enjoy !

Shares

>To scare a murder of crows

>The first visitor was a rabbit. I chased it out, shored up the fence, and thought all was well. Well, that is, except for the black beans planted right next to the fence opening. They’d been nibbled to the ground.

Next, just as the black beans were showing their little leafy heads above ground again, I found a big guy nicknamed Chuck Wood napping in my garden. After he left, I shored up the chicken wire again and vowed never, never to leave the gate open overnight again. Never.

Later, in the evening of the same day that Chuck visited, I found four crows nibbling on something on or near the pepper plants. Crows! Big ones! They scolded from the next yard as I waved and shouted enough to chase them away.

All right, already!! I’ve had enough! I love wildlife as much as the next eco-warrior, but this is MY GARDEN!! It’s food for my family! It’s my contribution to the family fridge! It’s the fresh organic veggies that will keep all of us healthy as long as the produce it produces may last!

Solution? I’m trying these. Old CDs, Windows 3.11 (isn’t that concept scary in itself?), now hang in the wind. Their shiny and strange reflection may deter those wild ones who might otherwise be attracted by the green goodies growing here.

I used the inner support from an old campaign sign to place a few CDs close to the former rabbit entry.

Maybe now I can weed around the black bean plants — and they might actually come up. Haha. A gardener can dream, a gardener can always dream.

Share and Enjoy !

Shares

>Strawberry Dump Cake

>I find recipes all over the Internet. This one was on Eco-Women: Protectors of the Planet! This group blog features environmental posts and suggestions and tips for being more eco-conscious. Cooking and baking local foods while they’re in season is a great way to think globally and act locally. Here’s a recipe for strawberries from their Enviro-Girl.

Enviro Girl’s Strawberry Dump Cake

Fill the bottom of a 9 x 11 casserole pan with 4-6 cups clean, sliced strawberries.
Top with ½ cup butter, cut into slices.
Dump on one plain yellow cake mix.
Top THAT with another ½ cup of butter cut into slices. Bake at 350 for 35 minutes.

Serve with ice cream (homemade, if you can) or whipped cream. Coffee on the side, of course. Yum!

Share and Enjoy !

Shares