>Potato wedges or striped spuds?

>I’m looking for something new, but not too new.
Something different, but something that uses cooking staples I have in the house.
Something tasty, but easy to cook.
A side dish to go with a simple supper, probably a chicken casserole.

There. Is that specific enough?
Oh. I didn’t think so.

I pulled out a family standard: an elementary school’s fundraiser cookbook. With half a bag of potatoes in the back hallway, I can make either of these. Advice, readers? Which one sounds the best?

Baked Potato Wedges
These look simple, and I keep the ingredients on hand most of the time.
3 large baking potatoes
1/4 cup oil
paprika
garlic salt
pepper
grated Parmesan cheese

Pour oil in ziploc bag. Scrub potatoes and cut into eighths for form wedges; blot edges dry with paper towel. Place in bag and shake to coat with oil. Place on baking sheet, skin side down. Sprinkle with seasonings. Bake at 425 F. for 30-40 minutes.

-The credit for this recipe belongs to a teacher with three young children. I imagine it’ll be simple, yet tasty.

Striped Spuds
At a glance, I question the cooking method. I usually dice or peel my potatoes before cooking. This calls for boiling in the skin. I wonder if it makes a difference in the final result?

6 potatoes
2 cups sour cream
1 1/2 shredded sharp cheddar cheese
1 1/2 teaspoon salt
1/4 teaspoon pepper
1 bunch green onions, chopped

Boil potatoes in skins until tender. Peel and mash in large bowl. Stir in sour cream, 1 cup of cheese, salt, pepper, and onions. Turn mix into buttered casserole. Top with leftover cheese. Cover and refrigerate overnight. Bake uncovered at 350 degrees F. for 30-40 minutes. Let stand 15 minutes before serving. Makes 10 servings.

Well, bloggie friends and Internet acquaintances, what do you think? I have potatoes in the pantry; what’ll it be?

Share and Enjoy !

Shares

>Having fun buying local

>We were taking care of details in La Petite’s college town. She had a photo montage that needed a unique frame; I was visiting and had a vehicle, so we ventured downtown to a small business she’d noticed on Main Street. The business owner worked with her in choosing the frame, planning the end result. I browsed.

He had set up a few tables of Wisconsin foodstuffs, all produced by small businesses in my fair snow-covered state. I looked them over, read the ingredients and the locations of the companies, and yes, I bought some. Two, in fact. I bought a brownie mix made by Dancin’ Tastebuds in Milwaukee and rainbow couscous (such a fun food it has to be named twice!) from Rice River Farms in Spooner.

This purchase doesn’t totally fit the 100 mile limitation for locavore eating (well, the Milwaukee piece comes close), but heck, I buy Door County products, too, so why not? Both looked delicious.
Then I got to thinking — a dangerous pastime, I know. As far as economic stimulus, we were both buying from a small business in her adopted small college town. She’ll be counted there in the census, and the campus and surrounding areas have been important parts of her life for the past few years. Yes, we were buying local – not my local, but her local. And that’s all good. The ripple effect will be good, too. This small business owner will continue to buy from food producers in Spooner and Milwaukee and more, encouraging state food production rather than trucking in merchandise from far away. Yes, this small shop on Main Street could become a regular stop for me when I visit my kiddo’s campus.

I like this little college town. Whatever will I do when she graduates?

Nope, this is not a sponsored post. Readers who know me recognize that this kind of shopping trip is right up my alley; small shop, locally owned, specializing in state products. Now if you’ll excuse me, I think I’ll go bake brownies.

Share and Enjoy !

Shares

>Raspberry Pecan Muffins

>

Alternate title: Fun with Cookbooks!

I received several cookbooks for Christmas – each unique, each serving a different need in our family’s quest to eat healthy and increase our sustainability. My brother and sister-in-law gave me Food to Live By by Myra Goodman, a cookbook with the subtitle “the Earthbound Farm Organic Cookbook.” This book is full of advice and anecdotes that make the transition to organic easy and enjoyable. When I made these muffins, the recipe sent me to references on other pages to make orange zest (fun with my new zester file!) and to toast the pecans. A sidebar talked about whole wheat pastry flour. I didn’t have the special flour, so I used the alternative: unbleached all-purpose. The raspberries were in my freezer, purchased and frozen last summer when they were in season. It was the perfect dish for a snowy February morning – with coffee, of course.

Raspberry Pecan Muffins

1 1/2 cups whole wheat pastry flour or unbleached all-purpose flour
3/4 cup sugar plus 1 Tablespoon for topping
2 teaspoons baking powder
1/2 teaspoon baking soda
1/2 teaspoon salt
1 large egg
1 cup buttermilk
1/4 cup canola oil
1 teaspoon grated lemon or orange zest (I used orange)
2/3 cup fresh raspberries or frozen, unsweetened raspberries
1/4 cup chopped pecans, toasted

1. Position a rack in the center of the oven and preheat the oven to 375 degrees Fahrenheit. Butter 12 standard size muffin cups.
2. Place the flour, 3/4 cup of sugar, baking powder, baking soda, and salt in a large bowl and whisk to combine well.
3. Place the egg, buttermilk, oil, and zest in a small bowl and whisk to combine well. Add the egg mixture to the flour mixture and stir with a rubber spatula until just combined. Gently fold in the raspberries and pecans. Do not overmix the batter or the muffins will be tough. Spoon the batter into the prepared muffin cups, filling them two-thirds full. Sprinkle the remaining 1 Tablespoon of sugar evenly over the batter.
4. Bake the muffins until they are golden brown and a toothpick inserted in the center of one comes out clean, 20-25 minutes.
5. Cool for about 10 minutes.

The muffins taste best the day they are made, but if necessary can be stored in an airtight container for up to 2 days.

This is not a compensated post in any way. I received the cookbook for Christmas and I’m enjoying exploring its recipes and stories! Look forward to more, readers.

Share and Enjoy !

Shares

>Zesty Orange Cookies

>I tried it, and it worked. I took the original Zesty Lime cookie recipe and tried it with orange zest and orange juice, and the cookies are delicious. I kept the lemon extract in for the tartness. The orange peel was freshly zested, and the juice freshly squeezed. Oh, the kitchen smelled good! Here it is: yet another way to use the case of oranges from the choir fund-raiser!

Zesty Orange Cookies

1 cup butter, softened
1 1/2 cups granulated sugar
1 teaspoon vanilla extract
1/2 teaspoon lemon extract
2 eggs or 1/2 cup egg substitute
2 1/2 cups all-purpose flour
1/2 cup orange juice
1 Tablespoon grated orange peel
powdered sugar for dusting (I only needed a few tablespoons)

Preheat oven to 350 degrees F. Cream butter; beat in sugar and extracts. Add eggs; mix well. Gradually add flour; mix well. Blend in orange juice and peel. Drop rounded teaspoonfuls of batter onto greased cookie sheets. Bake at 350 degrees for 10-12 minutes. Cool on pan for 1 minute, then transfer to wire racks and dust lightly with powdered sugar. Mmmm. Makes about 6 dozen.


This recipe is based on Zesty Lime cookies in the 2009 WE Energies Cookie Book. I can’t wait to try a few more.

Share and Enjoy !

Shares

>Zesty Lemon-Lime cookies

>adapted from Zesty Lime Cookies, from the We Energies Cookie Book 2009

Chuck teases me when I’m using my new zester file. “Don’t you have enough zest for a year? Or two?” he’ll say. To counter that, I keep finding recipes that use citrus zest in one way or another. Here’s one with lemon and lime flavor. The original was more lime; I had lemon and lime on hand, so I modified it.

Zesty Lemon-Lime Cookies

1 cup butter, softened
1 1/2 cup granulated sugar
1 teaspoon vanilla extract
1/2 teaspoon lemon extract
2 eggs (or 1/2 cup egg substitute)
1 1/2 cups all-purpose flour
1/4 cup lime juice
1/4 cup lemon juice
1 Tablespoon grated lemon and lime peels
powdered sugar for dusting

Preheat oven to 350 degrees F. Cream butter; beat in sugar and extracts. Add eggs; mix well. Gradually add flour; mix well. Blend in lime juice and peel. Drop rounded teaspoonfuls of batter onto greased cookie sheets. Bake at 350 degrees for 10-12 minutes. Cool on pan for 1 minute, then transfer to wire racks and dust lightly with powdered sugar. Makes about 6 dozen.

I wonder if it would work with orange?

Share and Enjoy !

Shares

>Spicy Chicken with a hint of sweet

>The original came in a cookbook I got for Christmas: Taste of Home’s Fast Fixes with Mixes. It’s aimed at using basic mixes in the pantry to create decent meals. I struggled with this at first; I’ve been moving toward cooking more from scratch, more whole ingredients and fewer pre-processed foods. But on further review, this quick-start philosophy can work for us. Here’s one, with the changes from my own experience.

Sweet and Spicy Chicken (adapted from Fast Fixes with Mixes)


1 pound boneless chicken breasts, cut in one inch cubes
1 package taco seasoning
1-2 Tablespoons olive oil
1 cup chunky salsa
1/2 cup orange marmalade
hot cooked rice

Place chicken in a zipper plastic bag with taco seasoning and toss to coat. In a skillet, heat oil and brown chicken. Combine salsa and marmalade; stir into skillet. Bring to a boil; cover and simmer for 2-3 minutes or until meat juices run clear.

Serve over rice. Serves 4.

Now, the backstory.

The original recipe calls for peach preserves: I couldn’t find these in my regular grocery or in the neighborhood corner market. I settled for orange marmalade; it provided the fruity sweetness and the right consistency.
The original also called for an entire 11 oz. jar of salsa. Holy tomato, Batman, that’s a lot of salsa! I couldn’t believe the dish needed that much salsa, so I cut it approximately in half.

I wrecked the rice. Believe it or not, I wrecked the rice. I overcooked the long grain white rice into mush while trying to fully cook the wild rice. Oops. I’ve successfully combined long grain brown rice with wild rice, but I forgot that white cooks faster. Much faster. The taste was okay, but the texture? Well, we won’t discuss texture. (I salvaged the rice by making fried rice later in the week; it worked well with Tex-Mex scrambled eggs)

Meanwhile, remember the case of oranges in the basement (choir fundraiser, December)? I’m eating at least one a day, but there are still too many left. The marmalade hasn’t thickened, but I’ve decided not to remake it. It’ll make a good cooking sauce, and we usually buy it for that purpose rather than to spread on toast. Fresh orange juice for a few days might help use up the oranges. Chuck got creative with grapefruit tonight: mixed it with marascino cherries for a fruit salad style side dish.

This is not a sponsored post. The cookbook was a Christmas gift. Thanks, MIL!

Share and Enjoy !

Shares

>Adventures in marmalade

>I had lots of oranges. I’ve committed to being more sustainable and self-sufficient in the kitchen. I bought a water-bath canning pot last August.

Put it all together and you get: Daisy’s Adventures in making Orange Marmalade!

The idea kind of grew on me. I searched for a recipe and found one in the classic Better Homes & Gardens Cookbook that we received as a wedding gift 25 years ago. Nervous about making something so new, so out of my comfort zone, I read and reread the recipe and instructions several times.

I searched the house for the supplies and ingredients. I had everything except (are you ready for this?) the right kind of pectin. It called for liquid pectin, so I went to (of course) Fleet Farm, the only store I know with an entire aisle devoted to supplies for canning and preserving. Yes, they had my liquid pectin. I almost bought extra, but said to myself, “Self, you’re going to do this right the first time. The next time you’re going to use this product it’ll be summer, so don’t stock up now. It is January, after all.” Please don’t laugh; that snort? It’s just not becoming.

So here I was with 4 medium oranges, 1 medium lemon, a little water, a little baking soda (why? it was in the recipe), a lot of sugar, and a pouch of liquid pectin.

Step 1:
Score orange and lemon peels into 4 lengthwise sections. Remove peels; scrape off white portion. Cut peels into very thin strips.
Oh, my goodness, this was tedious! There must be an easier way. Next time I might use my zester file, even though it’ll leave the marmalade with tiny pieces instead of strips.
Combine peels, water, and baking soda. I still don’t know what the baking soda did for this recipe, if anything. Marmalade doesn’t rise, so…. never mind. Bring to boiling. Cover; simmer for 10 minutes. Do not drain. (Italics in recipe)
Remove membrane from fruit. Section fruits, reserving juices; discard seeds. Oh, my goodness, tedious? This step was almost as bad. I can’t believe I complained so much, but I kept thinking, “there must be an easier way.”
Add sectioned fruits and juices to peel. Return to boiling. Cover and simmer for 20 minutes. Okay, I can do this. In the meantime, I was on Twitter and Plurk asking for advice.

Measure 3 cups. I had just shy of three cups; I did it anyway. In an 8- to 10- quart kettle combine the 3 cups fruit mixture and sugar. Bring to a full rolling boil; boil, uncovered, 1 minute. Remove from heat; stir in pectin. Skim off foam.

Then the water-bath canning began. This part was less traumatic than I’d feared. I ladled the marmalade into the half-pint jars, leaving a 1/4 inch head space as directed. I wiped the jar rims clean and adjusted the lids. I processed in the boiling water bath for 15 minutes (actually 20 – is that okay?) and ended up with 6 lovely jars of marmalade. I followed advice on the pectin package and turned the jars upside down while cooling so the fruit wouldn’t “float” and then flipped them right side up.

The result: The marmalade is too thin. Two days later (after the magic 48 hours) it still hasn’t fully set. What now? One source suggests I can re-cook it. I’ll look into it – I’d hate for all that scraping and de-membraning and the works to go to waste.

Any advice, foodie friends? Anyone? Anyone?

Share and Enjoy !

Shares

>Pumpkin Cookies!

>They’re out of season. The pumpkin came from a can, not fresh or frozen. I was feeling a small amount of guilt in my locavore, seasonal heart as I softened the butter and started mixing in the egg.

Then La Petite came by and looked over my shoulder. “Mmm, oatmeal cookies?” “Pumpkin cookies with oatmeal.” “Even better!” she proclaimed.
Then Chuck chimed in from the computer. “With chocolate chips?” “Yes, I was planning on it.”

I felt a lot better.

This recipe is so old the card is tattered. I really ought to type it up in a Word file like so many of my favorites. I’ve made these since my kiddos were really little. In fact, I’d feed them to my kids for breakfast when they were very young. Cookies for breakfast? Don’t judge me; these cookies are healthier than a poptart!

Great Pumpkin Cookies with Oatmeal and Chocolate Chips

3 cups unsifted all-purpose flour

1 cup whole wheat flour
2 cups quick oats
2 teaspoons baking soda
2 teaspoons ground cinnamon
1 teaspoon salt
1 1/2 cups butter or margarine, softened
2 cups firmly packed brown sugar
1 cup granulated sugar
1 egg or 1/4 cup egg substitute
1 teaspoon vanilla extract
1 16 oz. can solid pack pumpkin
1 cup semi-sweet chocolate chips

Preheat oven to 350. Combine flour, oats, soda, cinnamon, and salt: set aside.
Cream butter; gradually add sugars, beating until light and fluffy. Add egg and vanilla; mix well.
Alternate additions of dry ingredients and pumpkin, mixing well after each addition. Stir in chocolate chips.

Using a cookie scoop or a 1/8 cup measure, drop dough onto lightly greased cookie sheet.
Bake at 350 for 20-25 minutes, until cookies are firm and lightly browned. Cool on racks.

Optional: frost and decorate. Cream cheese frosting works well with these cookies.
Another option: replace chocolate chips with raisins.

Amigo was coming down the stairs as I pulled these out of the oven. He had two as soon as they cooled. Despite the non-locavore nature of the beast, these cookies hit the spot on a cold winter Saturday night.

Share and Enjoy !

Shares

>How much Zest is too much?

>

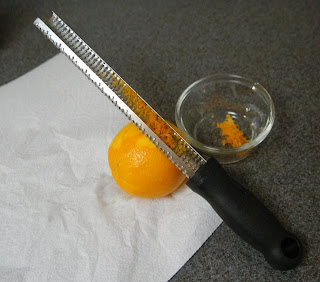
I got a citrus zest file for Christmas!

The timing is great; we picked up a case of oranges from Amigo’s high school music fundraiser in mid-December. I’ve been eating at least one orange or grapefruit a day, and then I zest the rind of the orange so we can use it in cooking or baking.

Chuck (he of the cool shoes) walked into the kitchen today and said, “Dear, you’ve put aside enough orange zest to last us a decade. Stop, already!”

I put it to you, dear Internetters. Foodies, locavores, eco-conscious cooks and bakers, here are the questions raised in my zesty dilemma.

Does orange zest (or any zest) freeze successfully? Can I grate and freeze these aromatic peelings and use them later?
Is there any use for grapefruit zest? I have a case of grapefruit, too, but I’ve never seen grapefruit zest in a recipe.
How much is too much orange zest? No, never mind, don’t answer that. I’ll find out for myself.

Share and Enjoy !

Shares

>Best Banana Bread

>I posted a banana bread recipe long, long ago. Banana bread is a standard in my repertoire, and I can almost make it in my sleep. Almost.

When La Petite was in high school, our house was one of the hangouts for the kids. I learned that they were more likely to hang at the homes of parents who fed them, so I kept baking. It worked. One day a coworker and fellow high school mom asked me for my banana bread recipe. “What do you put in it? Alex keeps raving about it!”

I tried an experiment, though, that didn’t work so well. It was one of “those” weeks: the weeks when we don’t have time to eat the bananas, much less bake them into bread. I tried the Frozen Banana option. Supposedly they’ll look gooey and awful, but will bake up well. Well, almost.

I called it the Incredible Collapsing Banana Bread. I thought it was done, but it wasn’t. the toothpick test came out clean, but the bread fell in the middle and tasted terrible. It was underdone in a big way. What happened? The only thing out of the ordinary was the frozen bananas. All I could think of was, “Were they too cold? Not the right consistency? What went wrong?”

I approached this dilemma with two tools: increased baking time and smaller pans. My mother (who witnessed the drama of the incredibly collapsed banana bread) gave me tiny bread pans for Christmas. I split a double batch of banana bread between one full-sized pan and three tiny ones. The tiny ones finished quickly, and the big one appeared done. Learning from experience, I let the big pan sit in the still-warm oven for ten minutes before calling it done. It worked.
The third tool (okay, three changes) was this: I made sure the banana goo was completely thawed and at room temperature before mixing and baking.

Well, here goes. Bake it as you wish; but thaw your bananas and use a smaller pan.

Daisy’s Banana Bread

2/3 cup sugar
1/4 cup margarine or butter, softened
3 eggs or 3/4 cup egg substitute
1 cup mashed ripe bananas (about 2 medium-large bananas)
1/2 teaspoon vanilla extract
1 2/3 cups flour (I like 1 cup all-purpose flour and 2/3 cup whole wheat)
1 teaspoon baking soda
1/4 teaspoon baking powder
1/2 teaspoon salt
1 teaspoon cinnamon
(optional) 1/2 cup chocolate chips and/or 1/2 cup walnuts

Preheat oven to 350 degrees. Spray an 8 or 9 inch loaf pan with non-stick cooking spray.
Beat the sugar and butter/margarine in a medium bowl with an electric mixer until light and fluffy. Add the eggs, bananas, and vanilla. Beat until well blended.
Mix together the flour, baking soda, baking powder, salt, and cinnamon. Stir into the banana mixture just until moistened. Blend in chocolate chips or nuts. Pour and scrape batter into the loaf pan.
Bake the 8 inch pan for 60 minutes, 9 inch pan for 45-50 minutes or until toothpick test comes out clean.
Cool 5 minutes. Loosen sides of loaf from pan. Remove from pan and cool completely on a rack before slicing.

Warning: Teenagers in house will inhale this. Make two if you want some for yourself.

Share and Enjoy !

Shares