The Trouble with Pickles

Not Tribbles, but Pickles. The trouble with dill pickles, specifically: the pickles have to rest and, well, pickle in their jars for at least two weeks before they’re ready to eat. At that time, if the pickle recipe didn’t work or if I messed it up somehow, it’ll be too late to go to the farm markets and buy pickling cucumbers. They’ll be out of season. Meanwhile, I’ll just hope the new-to-me-recipe for dill pickles is successful.

The trouble with canned tomatoes (diced or chopped, in my kitchen) is that the preparation takes a long time and a lot of effort. Dig out the stem, blanch and peel, chop, and then pack tightly into a jar. All of that happens before I can even consider putting the liquid in the jars, checking the head space, and then actually processing in the hot water bath canner. On top of all this, I have to hope that I packed the tomatoes tightly enough to avoid the perfectly functional but perfectly ugly Fruit Float.

The trouble with bread and butter sweet pickles; my food processor cuts the pickles too thin, so I have to cut them by hand. The food processor just died, so I’m glad cutting the pickles by hand is my usual routine. This one is really no trouble at all.

The trouble with salsa is similar to the trouble with canned tomatoes. Last weekend I convinced Chuck to join in the preparation of tomatoes, onions, and peppers. Since he is the main consumer of salsa in the house, it was only fair. Thoughtlessly rubbing his eye after dicing a jalapeno pepper? Well, that was only careless. Ouch.

The trouble with troubles in general? Not much, really. All of these problems are easily solved. All, that is, except the dill pickles. Two weeks from now, people, I will know if the new recipe is my go-to for dill pickles. Waiting…waiting…

Share and Enjoy !

Shares

Scraps or Pantry Raid – Tomato Soup

The end result was tomato vegetable soup, served with grilled cheese sandwiches and applesauce. Here’s how it came about.

I’d been canning tomatoes a few days earlier. The process of peeling tomatoes, while not like herding cats, is time consuming and yields an interesting leftover. To peel tomatoes, I drop several into hot water for a few minutes and then into ice water. The peels slide off (almost) effortlessly. Almost. The results: a lot of tomatoes without skins, and a big bowl of water laced with tomato remains.

On the theme of the TV show “Scraps,” I decided this tomato water was too good to throw away. On the theme of a Pantry Raid, I used only ingredients that were readily available in my freezer, refrigerator, or pantry. Nothing fancy!

Step one: we skimmed off some of the water floating on top. The tomato content kept sinking to the bottom, so why not?
Step two: poured the tomato water into a large slow cooker and let it simmer on high overnight.
Step three: add herbs. A few green onions, a clove of garlic, some minced basil – all simmered in the soupy mix for several hours.
Step four: Store boiled down mixture in refrigerator overnight.

To make soup for supper, I added a few simple ingredients along with salt and pepper, thickened with arrowroot starch (Penzey’s is the best), and served with crackers.

Simple ingredients added (but not measured precisely): a dash of Worcestershire Sauce, a small can of commercial tomato paste, salt and pepper, frozen peas & corn & shredded fresh zucchini.

This tomato soup, whether you call it a Scraps menu or a Pantry Raid, is a winner. Next time I can tomatoes, I might do the same!

Share and Enjoy !

Shares

The Continuing Saga of the Soil

In which Daisy discoveries the peas didn’t do well, but the beans? Stay tuned.

The peas, those lovely little vines that filled the space in between the random flowers, didn’t bear fruit. They produced a few tiny pods, but no peas. I don’t know if it was soil troubles, a hot & dry spell, or other issues, but my garden produced no peas. I pulled the plants and set them on yet another section of garden that didn’t produce any produce. When they dry, I’ll  toss the whole pile in the compost.

Beans, however, are looking great! They’re bushy as bush beans can be, reaching for the sun with their lovely little leaves and producing flowers and actual green beans. Yum! I have enough beans in the freezer already, so everything I harvest will be supper. Or lunch. Or raw beans for a snack (oh, yeah, they’re that good).

Meanwhile, I made a few decisions. The area with the non-producing pea plants will be devoted to flowers next year. I’m seeing more pollinators, so I’d like to keep them happy. The sections that just didn’t grow are getting an infusion of organic matter (a.k.a. compost).

As for behind the garage, the raspberries are coming back, little by little. Chuck trimmed a tree that was overreaching its borders (at the edge of the next door lot), and that helped allow more light into this area. I spread lots of parsley seeds so the parsley plot can expand even as the raspberries try to take over. Last, but never least, some of the bulbs for walking onions were trying to sprout in the tray where they were stored. I dug two shallow trenches and tossed the bulbs in. If they don’t come up this season, they’re likely to bloom next spring.

And that’s the current status of the Backyard Garden, folks.


Share and Enjoy !

Shares

In Season: Zucchini Bread with Cherries!

This may become my go-to recipe for zucchini bread. I made a few minor changes (I hear you laughing, you who know me well), but the basic recipe is from the Essential New York Times Cookbook. I do have a beef with the way it’s indexed. This wasn’t listed under zucchini; I found it in the Q section for Quick Breads, and then under S for the name of the pastry chef who created the recipe itself. That’s a little bit like the way I saved so many recipes under E for Easy-to-make or D for Delicious.

But anyway, here’s my version. When cherries are no longer available at the farm markets, but zucchini is still prolific, I’ll probably make this with chocolate chips. Mmm.

Zucchini Bread with add-ins (cherries this time)

2 cups grated zucchini

1 1/2 cups sugar

3/4 cup unsalted butter, melted

3 large eggs

2 teaspoons vanilla extract

3 cups whole wheat pastry flour (or all-purpose flour)

1 teaspoon baking soda

1/4 teaspoon salt

1 teaspoon ground cinnamon

3/4 cup chopped walnuts

1 cup fresh cherries, pitted and chopped

Combine sugar and butter in large mixing bowl. Beat together, adding eggs one at a time. Mix in vanilla.

In a medium bowl, sift flour, baking soda, baking powder, salt, and cinnamon. Add this mixture gradually to the liquid mixture, alternating with grated zucchini. Fold in walnuts and cherries or other add-ins.

Bake in loaf pan or three small loaf pans for 50-60 minutes. Remove from pan and cool on wire rack before slicing.

Share and Enjoy !

Shares

The Saga of the Soaked Seeds

in which Daisy decides she has nothing to lose and gets reckless in her planting

It was a wonderful night in June – good weather, nice breeze, rain in the forecast. The rain barrels were ready, and most of the garden was planted. I’d been filling in a few spots here and there, just to see how the combinations would work. Carrots, turnips, parsnips alongside the tomatoes; a few more peas near the flowers; beans galore. The sun was going down as Amigo and I went inside.

It was a good night for sleeping. Cool, a steady rain, nice breezes. I woke up refreshed and ready to check on my garden plots and pallet experiment. But when I looked outside, I saw something ominous on the picnic table: my basket of seed packets, soaked through. AAAAAUGH!!!

My first reaction was to try to fix it. Dry them out! Use the oven on super-low setting! Try the grow lights! Dry the seeds before they germinate all at once! Well, they dried, but I’m still not sure they’re viable.

Since some of my seed packets were more than a year or two old, I decided that this will be the year I throw them all away in the fall. I’ll start fresh with new seeds and no more hoarding. Well, maybe no more hoarding. Seeds don’t take up much space. In the meantime, I’ll play around with what’s left. There’s nothing to lose, after all. There are large sections of my garden that are only growing weeds, anyway. I might as well toss a few seeds here and a few more there.

So, readers, I’ll share the results with you soon. So far, parsnips are going nowhere, dill is hibernating (and the dill seeds didn’t get soaked with the rest, either). Lettuce looks promising, if the chipmunk will stay out of the way.

Predictions, anyone? Will the damaged seed stock be any good? What kind of results do you expect?

Share and Enjoy !

Shares

Skillet Green Beans

It’s transition time at the Farm Markets in my region – the transition between pea season and green bean season. I suppose I should include yellow beans and purple beans, too, but mainly I buy the green. This recipe turned up in my employer’s wellness newsletter. I wonder if it would work for the purple, without losing the color?

Simple Skillet Green Beans

Ingredients:

2 tablespoons extra virgin olive oil

1/2 teaspoon red pepper flake, or to taste

1.5 pounds green beans, trimmed

2 cloves garlic, minced

1/2 teaspoon coarse kosher salt

2 tablespoons water

Directions:

Heat oil in a large skillet over medium-high heat. Add red pepper flakes and stir to coat the pepper in the oil. Add green beans and cook, stirring often until the beans are blistering and browning in areas, 5-7 minutes. Add garlic and salt and cook, stirring constantly until the garlic is fragrant and browning, about 30 seconds. Add water and immediately cover. Cook covered until the beans are right green and crisp tender, 1-2 minutes. Serve immediately.

With fresh green beans from the market, this sounds awesome. Readers, how about those yellow and purple beans? Any opinions?

Share and Enjoy !

Shares

Why Doesn’t my Garden Grow?

Three major section of my raised beds are growing nothing but weeds. I have a few theories, but I’m not entirely sure. I’m hoping to narrow down the possibilities so I can figure out what to do about the problem.

Suspect number one: poor seeds

  • The basket of seeds got soaked when I left it out overnight. I successfully dried the packages, but did I manage to destroy their viability?
  • I like to stock up during late season clearance sales. The seeds I used could have been old.

Suspect number two: feathered and furry creatures

  • Birds! I suspect cardinals in the demise of my butterfly garden seed mat.
  • Chipmunks! Or chipmunk! Darn thing slips through the tiniest gaps in the fencing, and I find holes all over.
  • Rabbits? Not likely this time. The wire fencing is pretty good.

Suspect number three: random environmental influences

  • Seeds planted too late
  • Weather – too hot
  • Weather – too cold
  • Weather – too wet
  • Poor soil – doubtful. Treating my soil with compost, etc., would take a number of posts. The green “walking” onions around the edges are growing beautifully, too.

Incidentally, the pallet garden and the various containers are doing very well. Herbs, mainly, along with a few leafy edibles and flowers, all thriving. The rest? I’ll keep trying to make it work. Promote growth. Plant something that comes up, already.

Readers, suggestions? I have a gauge for testing soil pH. I might try that. What else do you recommend?

Share and Enjoy !

Shares

Good Intentions & Container Gardening

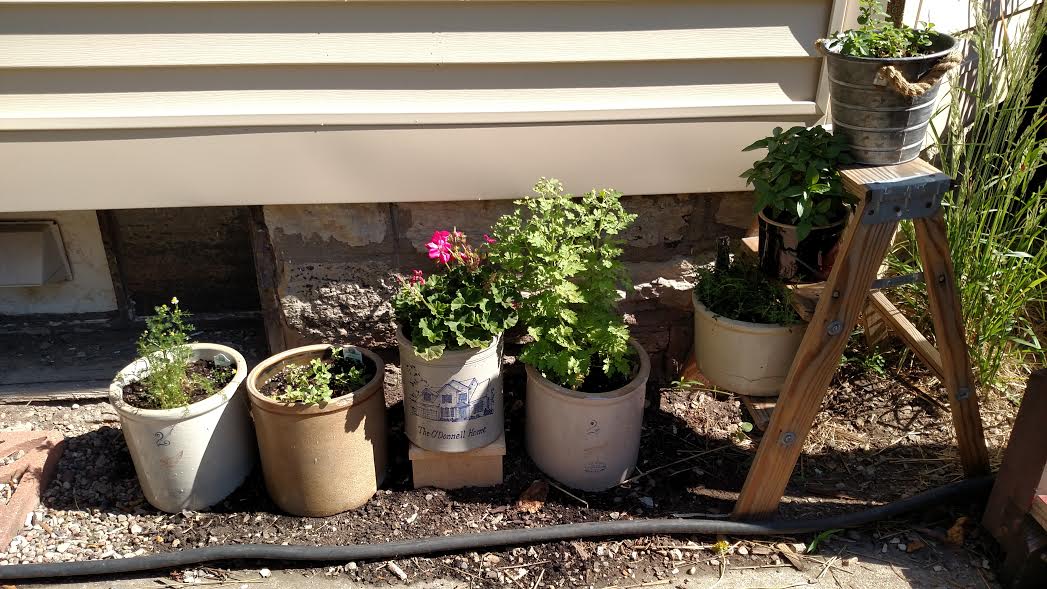
Here’s a picture of last year’s Crock Garden. I reused a few of the same crocks this June, and I have a couple of new ones. I’ll share – well, I’ll plan to share. Good intentions and all, right?

The Crock Garden

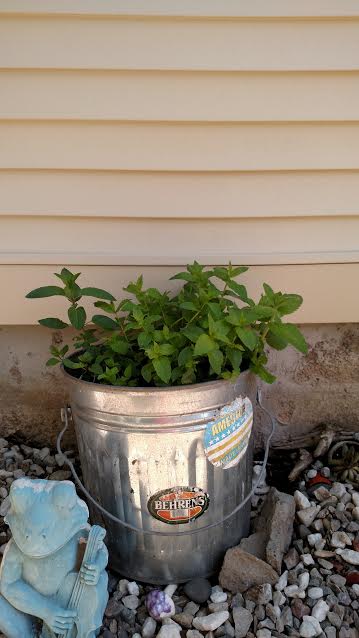
Just a few feet away sits the Rock Garden. In the rock garden is a large bucket filled with mint.

Mint – confined to a container

That’s Amigo’s alter ego on the left: the frog playing cello.

I have more to share in the Rock Garden, too. I’ll share soon – at least I intend to share soon!

Share and Enjoy !

Shares

Rhubarb-Strawberry Slab Pie

Taste of Home called it raspberry, not strawberry. In my part of this world, the rhubarb is usually in season with strawberries, less so with raspberries. I pulled both strawberries and raspberries out of the freezer to make this. Rhubarb? I had plenty. In fact, I had enough rhubarb leftover to freeze for later.

The pie was big, too. We took some to Petunia, some to Chuck’s mom, and I gave three pieces to the next door neighbors.

Berry-Rhubarb Slab Pie

based on a recipe from Taste of Home

Ingredients:

3 1/4 cups all-purpose flour (or my favorite, whole wheat pastry flour)

1 teaspoon salt

3/4 cup milk

1 egg

2 cups sugar

1/3 cup cornstarch

8 cups fruit: rhubarb, strawberries or raspberries

Directions:

In a large bowl, combine flour and salt; cut in butter until crumbly. Whisk milk and egg; gradually add to flour mixture. Mix with fork until dough forms a ball. Divide dough into two portions, one slightly larger than the other. Wrap each in plastic wrap. Refrigerate at least one hour.

Preheat oven to 375 degrees. Roll out larger portion of dough in a rectangle about 18 by 13 inches. Press dough into a 15x10x1 inch baking pan. In a large bowl, combine sugar and cornstarch. Add berries and rhubarb; toss to coat. Spread on pastry.

Roll out remaining dough; place over filling. Pull up edges of lower crust and press them together. Poke top crust with a fork in several places.

Bake 45 – 55 minutes until crust is golden brown. Serve warm with whipped cream or vanilla ice cream.

If you have a large enough family, you won’t have to give any away.

Share and Enjoy !

Shares

Goals – inside, outside

It’s summertime – the approximate ten week period that passes for a “break” in our oddly outdated agrarian school calendar. In the old, old bygone days, students would help at home on the farm in spring, summer, and then harvest season in the fall. School terms might be limited to winter or some of the town and city kids might come in early fall while the farm families kept their children home to work the land.

But I digress.

It’s summertime, and the living is relatively easy. I can sleep in, but I don’t. My body clock is set firmly between 6 and 7 A.M. I’m up and at ’em, coffee cup in hand. Up and at what? That’s where the goals come in.

I’ve decided to make one indoor goal and one outdoor goal. Daily tasks such as loading, running, and emptying the dishwasher don’t count. Watering the garden and the containers doesn’t count, either. It’s a necessity.

Yesterday the outdoor goal was to fix up the rock garden. That entailed getting rocks and sculptures and misc. from the garage and placing it strategically in the rock garden. Inside? Clean the bunny cage & replace used litter box with clean box.

The goals are a minimum. I don’t stop there. Having definite goals, no matter how small, keeps me from feeling overwhelmed. “I must get more done! Must accomplish! Must do, go, achieve!” Nope. It’s a long break, and it’s a break. Setting and meeting goals is good for my mental health. Meeting goals allows me to let go of the gotta-get-it-done attitude and relax.

That said, here are today’s main goals. Indoors: laundry. Outdoors: lift pallet garden to a steeper angle. Chuck helped with that one.

And now, while I wait for the first load of laundry to rinse and spin, I can relax.

Readers, do you set goals? Give yourself permission to take care of yourself? Leave comments. I’d like to know.

Share and Enjoy !

Shares